For a course in secure development that I am teaching, I recently outlined some of the different ways available to implement authentication in .NET-aplications. The purpose was mainly to highlight the different types of data that cross the wire (and which endpoints are part of the interaction), so that developers are just a little more aware of the risks involved in each authentication method, and the ways to mitigate those risks.
Direct Authentication
The first two authentication methods, Forms Authentication and NTLM, can be labeled direct authentication, as opposed to brokered authentication (below). ‘Direct’ here refers to the fact that the client only interacts directly with the server during the authentication handshake.
Forms Authentication
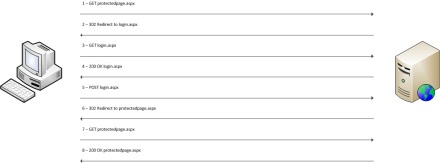
The first direct method of authentication, widely used back in the days of membership providers and the like, is plain old forms authentication; the request/response sequence is shown in the image below.
As you probably know, this authentication method simply redirects the unauthenticated user to a login page, where the user can fill out his credentials. These credentials are then posted over the wire, and upon successful authentication the user is redirected back to the page he initially tried to visit. So unless the connection is protected with SSL, the credentials are sent over the wire in clear-text at step 5.
NTLM
The other direct authentication method I want to discuss is NTLM. This authentication method is typically used to authenticate against a domain-joined web server, whose users are stored in Active Directory. As you can see in the image below, an NTLM handshake does not redirect the user to a login page; instead it kind of abuses the “401 Unauthorized” HTTP status code.
Apart from the fact that NTLM does not use redirects, the main difference between NLTM and Forms is that the password does not travel over the wire in clear-text, even if no SSL is used. Instead, it uses hashing to let the user prove that he knows the password without actually having to disclose it. In step 2, the client receives a 401, as well as a WWW-Authenticate header with the value ‘NTLM’, to let the client know that a NTLM handshake is expected. In step 3, the client sends a so-called NLTM Type 1 Message to the server. This message contains the hostname and the domain name of the client. In response, the server again answers with a 401 in step 4, but this time it includes a NLTM Type 2 Message in the WWW-Authenticate header. This message contains a challenge called the nonce. For the purpose of this post, this is just a set of characters. The client performs a third GET to the server in step 5, and it includes an NLTM Type 3 Message. This message contains the user name, again the hostname and the domain name, and the two client responses to the challenge: a LanManager response and an NT response, calculated using the nonce and the LM password hash and the NT password hash respectively. Upon receiving this message, the server can use the user name to look up the users’ password hashes and caculate the expected reponse given the nonce. If the client-provided response matches with the expected reponse, access is granted.
It should be noted that, even though the password does not travel over the wire in clear-text, the LM and NT hashes are not exactly super-safe. And even though the addition of the nonce makes the responses a type of salted hashes, I would still highly recommend using SSL here.
Brokered Authentication
The other two authentication methods I want to discuss (Kerberos and claims) can be dubbed brokered authentication. This means that the client does not only interact with the server to complete the authentication handshake, but also (and even primarily) with a third party: an identity store. In .NET environments, this identity store is typically Active Directory.
Kerberos
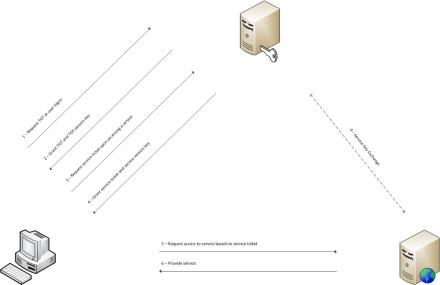
Another way of authenticating in a Windows (read: Active Directory) environment, is by using Kerberos. Kerberos is a ticket-based method of authentication, and these tickets are distributed by a KDC (Key Distribution Center). This KDC resides on a Domain Controller, as does the user database of a Windows domain, Active Directory. The image below shows a Kerberos sequence in the order in which the different tickets are issued.
Before we dive into the contents of all the requests and responses as lined out in the image, a note on something we call ‘long-term keys’. These types of keys will frequently pop up when we try to make sense of Kerberos, so I want to make clear beforehand that those are all password-derived keys. So when we talk about a user’s long-term key, we mean a key that is derived from the user’s password. This key is accessible to the KDC, and can also be calculated by anyone who has knowledge of the password. The same goes for a service’s long-term key: that’s simply a key that is derived from the service account’s password.
Now, as you can see in the image, the user requests a TGT (Ticket-Granting Ticket) upon logging on to his workstation. The request contains the user principal name, the domain name, and a timestamp that is encrypted with the user’s long-term key. By looking up this long-term key and decrypting and evaluating the timestamp, the KDC can be sure (enough) that only a user with knowledge of the password could have created the request. (This is one of the reasons why the time on a workstation must be in sync with the KDC.) The KDC response provides the client with a TGS (Ticket-Granting Service) session key, and a TGT (Ticket-Granting Ticket). The TGS session key, which is the key the client will use in subsequent interactions with the KDC, is encrypted with the user’s long-term key. The TGT contains a copy of the TGS session key and some authorization data, and is encrypted with the KDC’s long-term key. So the client only has ‘real’ access to the TGS session key, and even though he possesses the TGT, he cannot see inside it or modify it without the KDC noticing.
When the client wants to access a service (say an intranet web application), he first goes back to the KDC and requests a ticket to access the service. The request contains the TGT, the name of the server and the server domain the user is trying to access, and an authenticator containing a timestamp. The authenticator is encrypted with the TGS session key that the client shares with the KDC. Note that the KDC does not have to hold on to the TGS session key itself: it is embedded in the client request because it is part of the TGT, which is encrypted with the KDC’s long-term key.
When the request for a service key is legitimate (which is verified by decrypting the authenticator that holds a timestamp), the KDC issues a service ticket and a service session key to the client. The session key is the key that the client will use in its interactions with the target server; it is encrypted with the user’s long-term key. The service ticket contains a copy of the service session key and is encrypted with the service’s long-term key.
Now the client can start interacting with the service it is trying to access by passing it an authenticator containing a timestamp, and the service ticket. The service session key is used to encrypt the authenticator, and since it is also embedded in the service ticket, the service gains possession of the session key so that it can decrypt and validate the authenticator.
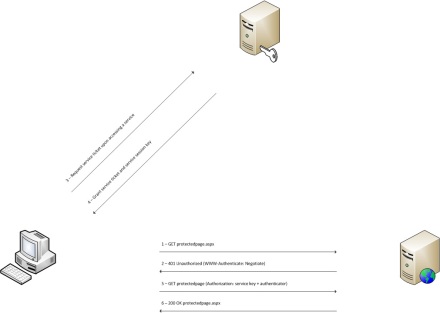
Of course, when looking at things from the perspective of the client that is trying to access a service, the interaction is a bit different: the client first requests access to the service, which refuses access and tells to client to go get a Kerberos ticket first. This interaction is shown in the image below.
Claims-based Authentication
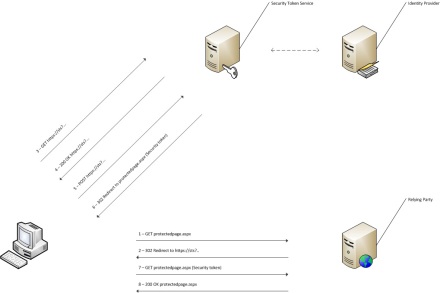
The last authentication method I want to discuss is claims-based authentication. As can be seen in the image below, it uses interactions with an endpoint other than the target server, just like Kerberos. But unlike Kerberos, all requests and responses are HTTP-based. This makes claims-based authentication much more useful for a variety of environments, and not just for a Windows environment with domains and domain trusts that are required for Kerberos.
As the image shows, the target server (called an RP (Relying Party) in claims-lingo) redirects the unauthenticated client to something called an STS (Security Token Service) when the client tries to access a protected resource. The client then starts interacting with the STS. The STS typically interacts with a user store (called an IdP (Identity Provider)) to authenticate the user. The interaction in the image shows a simple forms-based authentication handshake going on between the client and the STS, but this could just as well be NTLM or Kerberos. It can even be a claims-based authentication sequence all over again, if the STS further redirects the client to another STS instead of authenticating him against an IdP. But whichever mechanism is used to authenticate against the STS, if the client is successfully authenticated the STS provides the client with a Security Token and redirects him back to the RP. If the RP understands the Security Token and finds the claims it needs to authenticate and authorize the user, it starts serving the protected resource.
To make all this possible, we need to establish trust between the STS and the RP: the RP needs to know what kind of token to expect from the STS, and the STS needs to know what kind of token to prepare for the RP. This trust is established once and out-of-band, typically when the RP is first deployed.
When using claims-based authentication, the user’s credentials may or may not travel the wire in some form or another, depending on the authentication mechanism used at the STS. More important though in this context, the token travels from the STS to the client, and then from the client to the RP. And this token may contain sentitive user information, possibly a photograph (although I would not recommend putting it in there). It may also contain information that is used to authorize a user at the RP, such as role claims. But even though we apparently need to protect that token, SSL does not help here: SSL is point-to-point, so it is only protects the data as it travels from the STS to the client, and from the client to the RP. In other words: at the client itself, the token is visible in clear-text. So even though SSL might solve the problem of the ill-conceived photograph, it won’t help with the role claims: it may be no problem for the user to see and change its own photo, but it is certainly a problem if the user can change or add role claims.
What any STS worthy of the name enforces, therefore, is token signing. This works by means of an X509-certificate, the private key of which is only known at the STS. When trust between the STS and the RP is established, the public key is exported to the RP. Now, when a client requests a token from the STS, that token is signed using the private key at the STS. Then, when the token reaches the RP, the signature is verified with the public key. If the client (or someone else along the way) changed the token, signature verification will fail and the RP will not grant access.
If you also want to prevent the user (or anyone who can intercept the network traffic when SSL is not used) from reading the contents of his own token, you can optionally encrypt it. This also works using an X509-certificate, but this one’s private key is only available at the RP. Upon establishing trust, the public key is exported to the STS, so that it can be used to encrypt the token. The RP can then decrypt the token using its own private key and verify its signature, and be sure that the STS created the token and that nobody was able to read or change its contents.
So, is SSL redundant when using token signing and encryption? Well, no, not entirely. The connection between the client and the STS handles authentication against the STS, and that will most likely involve some form of credential-derived data travelling the wire. That in itself is enough to warrant SSL between the client and the STS. Now, theoretically, SSL is not required between the client and the RP when the token is both signed and encrypted. But if you go through all this trouble to protect the claims in the ticket, chances are that the resource you are protecting also involves sensitive data traveling back and forth between client and RP, making SSL required here, too.


