How to Handle Credential Provisioning and Key Rolling with the Microsoft Graph API

Not too long ago I investigated the options to manage the lifecycle of Azure Active Directory app registrations at scale. Most importantly, it needed to be fully automated; the numbers are simply too large to have manual steps in the entire process. For obvious reasons, the Microsoft Graph API plays a big role in making this a reality. And while the documentation and samples are pretty comprehensive (especially for the more common use cases), I stumbled upon a little gem in the API that’s not documented at all, and only sparsely so in the documentation for the Azure AD Graph API (the predecessor of the Microsoft Graph). It’s the addKey (and removeKey) action on the Application object, and in the end it enabled me to do key rolling with nothing more than direct communication between the registered app and the Graph API. But it took me half a day to get it to work, so I’m sharing my findings here; maybe it saves someone that half a day. I’ll be going through the details of how this works; if you’re just looking for the end-to-end solution, just skip right over there.

Let’s start with an outline of what we’re trying to achieve. First of all, upon provisioning a new app, we want to provision it with a temporary key of some sort. This temp key should enable the app to generate and register its own key that has a more extended validity period. That way, we want to ensure that only the app itself and Azure AD have knowledge of keys that are valid for a prolonged period of time. And secondly, even though the app-generated key should be valid for a longer period, best practices dictate that it should still have an expiration date. Determining a reasonable validity period depends on the context and possible compliancy regulations, but something like 1 or 2 years would be typical. When the expiration date approaches, the app needs to generate a new key, register that with Azure AD, and possibly retract the previous key.

Now, Azure AD app registrations allow for both symmetric and asymmetric (i.e. certificate) keys, but it’s a best practice to use asymmetric keys wherever possible. To add to that, certificate credentials are required for the approach I’m detailing here, so we’re using certificates. All the heavy lifting is done by a request to https://graph.microsoft.com/v1.0/applications/{id}/microsoft.graph.addKey
– which, as said, is not documented anywhere in the documentation. It is mentioned in the Azure AD Graph API documentation, and it was only through the Microsoft.Graph Nuget package that I suspected it might be available and functional in the Microsoft Graph. So based on the Azure AD Graph docs, let’s dissect all the pieces for a valid request.

Authorization header

Of course, every call to the Graph API must include a Bearer token in the Authorization header. There are numerous examples online on how to obtain such a token; one way would be to use the Microsoft Authentication Library (MSAL):


private async Task<string> GetTokenAsync(string appId, X509Certificate2 certificate, string tenantId)
{
var app = ConfidentialClientApplicationBuilder.Create(appId)
.WithAuthority($"https://login.microsoftonline.com/{tenantId}/")
.WithCertificate(certificate)
.Build();
var scopes = new[] { "https://graph.microsoft.com/.default" };
var result = await app.AcquireTokenForClient(scopes).ExecuteAsync();
return result.AccessToken;
}

The interesting bit here is that the token should represent the app for which we’re trying to call addKey. So we don’t need another app identity that has permissions to manage apps in the Azure AD tenant to make this call for us. In fact, that’s not even possible: this addKey action seems to be designed from the ground up to provide self-service key management functionality to registered apps. And the best thing is that the app doesn’t need any special permission for this; a newly registered app with default permissions can do this just fine.

Proof

Moving on to the request body, the proof property is the most interesting one: it’s supposed to be “A signed JWT token used as a proof of possession of the existing keys“. And this existing key “is the private key of one of the application existing certificates“. This is why certificate credentials are required for this approach. Together with some other requirements for this self-signed JWT token, the full code for constructing one looks like this:


private string GetJwtTokenProof(X509Certificate2 signingCert, string appId)
{
var notBefore = DateTime.Now;
var expires = notBefore.AddMinutes(10);
var handler = new JwtSecurityTokenHandler();
var credentials = new X509SigningCredentials(signingCert);
var jwtToken = handler.CreateJwtSecurityToken(appId, "https://graph.windows.net", null, notBefore, expires, null, credentials);
return handler.WriteToken(jwtToken);
}

Note that this code requires the System.IdentityModel.Tokens.Jwt Nuget package.

Key credential

The details regarding the request body depend on whether or not you’re using the Graph client (as opposed to manually constructing the HTTP calls, for example), but if you are, this is simply a matter a creating a KeyCredential object:


private KeyCredential CreateKeyCredential(X509Certificate2 certificate)
{
return new KeyCredential()
{
Key = certificate.RawData,
Usage = "Verify",
Type = "AsymmetricX509Cert"
};
}

Putting it all together

This is all there is to it to enable an app to make a call to Azure AD to register a new certificate for itself (or revoke one, for that matter). So it nicely fulfills our requirements: we can provision the app with a temporary certificate we create centrally, with a validity of just 1 or 2 days. Using that certificate, the app can self-sign a new certificate, use the temporary one to sign the JWT token proof to register the new one, and then use the newly registered certificate to revoke the temporary one. Equally, when a certificate is about to expire, it can use the same flow to create and register a new one and revoke the old one. The complete code looks like this:


using Microsoft.Graph;
using Microsoft.Identity.Client;
using Microsoft.IdentityModel.Tokens;
using System;
using System.IdentityModel.Tokens.Jwt;
using System.Linq;
using System.Net.Http.Headers;
using System.Security.Cryptography.X509Certificates;
using System.Threading.Tasks;
namespace AzureADAppManagement
{
public class AppCertificateManager
{
public async Task RollCertificatesAsync(string appId, string appObjectId, string tenantId, X509Certificate2 existingCertificate, X509Certificate2 newCertificate)
{
var graph = GetGraphClient(() => GetTokenAsync(appId, existingCertificate, tenantId));
var keyCredential = CreateKeyCredential(newCertificate);
var proof = GetJwtTokenProof(existingCertificate, appId);
await graph.Applications[appObjectId].AddKey(keyCredential, proof).Request().PostAsync();
// Waiting 120 secs; proceeding immediately may result in failure if the new cert is not fully processed server side
// Not sure how much time is appropriate here, to be honest. 120 secs seems excessive, but 20 secs for example has proven too short
await Task.Delay(120000);
// Re-init the client to use the new cert for token retrieval
graph = GetGraphClient(() => GetTokenAsync(appId, newCertificate, tenantId));
// Find the keyId for the old certificate
var app = await graph.Applications[appObjectId].Request().GetAsync();
var keyId = app.KeyCredentials.Single(key =>
{
return Convert.ToBase64String(key.CustomKeyIdentifier).Equals(existingCertificate.Thumbprint, StringComparison.OrdinalIgnoreCase);
}).KeyId;
// Create new proof based on the new certificate
proof = GetJwtTokenProof(newCertificate, appId);
// Remove the old certificate
await graph.Applications[appObjectId].RemoveKey(keyId.Value, proof).Request().PostAsync();
}
private GraphServiceClient GetGraphClient(Func<Task<string>> tokenDelegate)
{
return new GraphServiceClient(new DelegateAuthenticationProvider(async (requestMessage) =>
{
var token = await tokenDelegate();
requestMessage
.Headers
.Authorization = new AuthenticationHeaderValue("bearer", token);
}));
}
private async Task<string> GetTokenAsync(string appId, X509Certificate2 certificate, string tenantId)
{
var app = ConfidentialClientApplicationBuilder.Create(appId)
.WithAuthority($"https://login.microsoftonline.com/{tenantId}/")
.WithCertificate(certificate)
.Build();
var scopes = new[] { "https://graph.microsoft.com/.default" };
var result = await app.AcquireTokenForClient(scopes).ExecuteAsync();
return result.AccessToken;
}
private string GetJwtTokenProof(X509Certificate2 signingCert, string appId)
{
var notBefore = DateTime.Now;
var expires = notBefore.AddMinutes(10);
var handler = new JwtSecurityTokenHandler();
var credentials = new X509SigningCredentials(signingCert);
var jwtToken = handler.CreateJwtSecurityToken(appId, "https://graph.windows.net", null, notBefore, expires, null, credentials);
return handler.WriteToken(jwtToken);
}
private KeyCredential CreateKeyCredential(X509Certificate2 certificate)
{
return new KeyCredential()
{
Key = certificate.RawData,
Usage = "Verify",
Type = "AsymmetricX509Cert"
};
}
}
}

Why I prefer this approach

Of course there are different ways of handling credential provisioning and key rolling. For example: the application could just be provisioned with a centrally generated (symmetric or asymmetric) key that’s intended as the definitive key (during that 1 or 2 year validity period). However, this would mean that this central agent has, at some point in time, knowledge of these long-term credentials, which would increase the risk associated and therefore the measures taken to properly protect it. The same applies to key rolling: you could have the apps call into a custom-built API to signal its desire to renew its key, or you could orchestrate the key rolling process from a central agent altogether. But again, that would imply having these credentials available in a runtime that’s neither client nor Identity Provider. Furthermore, this agent would need extensive permissions on the Microsoft Graph to actually be able to register new credentials. Especially in case this agent is callable by external parties (such as a client initiating a key rolling process), you would need to make very sure that you’ve covered your bases to prevent Elevation of Privilege.

And just to reiterate: the addKey approach works without special Microsoft Graph permissions, and it only works when the call includes a Bearer token that represents the app itself, so the possible attack surface is greatly reduced. Of course you’d still need to centrally provision that initial temporary certificate, so security measures are still applicable for the agent handling that, but the keys it generates can have a very limited validity. And since it plays no part in the key rolling process, it’s not callable from the outside, and is therefore more easily secured.

So, all in all, I really like this hidden gem in the Microsoft Graph API. Let me know what you think in the comments!
Advertisement

Hosting a Single Page App behind Azure Application Gateway Without Breaking Deep Links

Recently I was working with a colleague who’s developing a Single Page Application (using React, but the same would apply to any JavaScript SPA framework). We wanted to host the app as a static website in Azure Blob Storage, as that’s the most cost-effective and low-maintenance option for hosting this type of static content. Publishing would happen through Azure Application Gateway.

SPA’s and deep linking

One of the challenges with single page apps is how to handle deep linking. In other words: if the user starts neatly at http://hostname.com and navigates from there, the SPA framework will handle the routing and ensure that http://hostname.com/path/to/content will trigger the loading of a view. But when a user bookmarks that link and uses it directly, the server will try to look for some file that sits at that location – and fail, because the app is actually contained in that single page (typically index.html).

This was no different for us, so we needed some URL rewriting-like mechanism to ensure that a request to http://hostname.com/path/to/content would re-route to http://hostname.com (or http://hostname.com/index.html). That way, index.html would be served to the user for every request to load the SPA app, which in turn loads the requested view.

Obviously, a static website in Blob Storage doesn’t provide this out of the box, so we considered using Azure CDN which offers some tiers that support URL rewriting options capable of this. But for me, it seemed wrong to require the use of a CDN to do URL rewriting: it negatively affects both the cost-effectiveness and the low-maintenance properties that made us host it in Blob Storage. And, maybe even more important: that’s not what a CDN is for.

Besides, for all our other outward-facing applications, we’re using Azure Application Gateway already anyway, to do load-balancing and firewalling. So I preferred handling this in Application Gateway through path-based routing rules, and a HTTP setting with the ‘Override backend path’ set.

Failed approaches

The first attempt was to simply set the backend path to /index.html, in the hopes that all requests would end up at http://hostname.com/index.html. This didn’t work, however: what this setting does is basically prepending the path override to the requested path. So the full URL would read: http://hostname.com/index.html/path/to/content. And that will not serve up index.html.

On the second attempt, I tried /index.html/# as the override backend path. The resulting URL would be http://hostname.com/index.html/#/path/to/content, and I hoped that this would work, but for some reason that’s still unclear to me, it doesn’t.

Third time’s a charm

The third attempt was a winner however, even though in my mind it’s just a variation on the fragment identifier-approach: once I set it to /index.html?path=, it all started working like a charm. That made sense to me, since the resulting URL would now be http://hostname.com/index.html?path=/path/to/content, i.e. a URL that points to index.html. Again, I fail to see why the URI fragment approach did not work, so if someone can shed some light, please do!

An alternative approach

After all was said and done, however, we landed on a different solution altogether. Having a dependency on Application Gateway is not too big of an issue for us since we’re using it anyway, but having no dependency at all is still preferable. So we simply changed the routing in the app itself to use a fragment identifier. So instead of expecting http://hostname.com/path/to/content, the app now expects http://hostname.com/#/path/to/content. That way, index.html is always being served by default, without URL rewriting and without using the ‘Override backend path’ setting. This may negatively affect indexation by search engines, but since our app sits behind a login anyway, this doesn’t matter for us.

But since search engine indexation may matter to some, I figured I’d share my initial approach anyway, for everyone who has a need to host an SPA behind Application Gateway and retain search engine-friendly deep linking support.

Leveraging ARM templates for deploying Azure CosmosDB

The other day I stumbled upon the brand new (but long awaited) ARM support for CosmosDB databases and collections. CosmosDB ARM support used to be limited to just provisioning the database account. Everything inside it, such as databases and collections, had to be provisioned using some other mechanism, such as PowerShell or Azure CLI – or heaven forbid, the portal.

But that’s over: support for ARM is finally here! It’s not all perfect yet, though. I guess Rome wasn’t build in a day either, so let’s count our blessings – and find workarounds for what’s still missing.

One of those workarounds has to do with provisioning and updating throughput (i.e. RU/s) on either a database or a collection. Provisioning throughput upon creating a new database can be done by setting an options object with a throughput property in the database resource for example, like so:


{
"type": "Microsoft.DocumentDB/databaseAccounts/apis/databases",
"name": "[concat(variables('databaseAccountName'), '/sql/', variables('databaseName'))]",
"apiVersion": "2016-03-31",
"dependsOn": [ "[resourceId('Microsoft.DocumentDB/databaseAccounts/', variables('databaseAccountName'))]" ],
"properties": {
"resource": {
"id": "[variables('databaseName')]"
},
"options": {
"throughput": "400"
}
}
}

But, changing that value after initial creation is not allowed. Updates to that value can instead be passed through a nested settings resource, like this:


{
"type": "Microsoft.DocumentDB/databaseAccounts/apis/databases/settings",
"name": "[concat(variables('databaseAccountName'), '/sql/', variables('databaseName'), '/throughput')]",
"apiVersion": "2016-03-31",
"dependsOn": [
"[resourceId('Microsoft.DocumentDB/databaseAccounts/apis/databases', variables('databaseAccountName'), 'sql', variables('databaseName'))]"
],
"properties": {
"resource": {
"throughput": "500"
}
}
}

And this settings resource, in turn, is only valid as a child to a parent resource that is itself already provisioned with throughput – so a template only holding a settings resource with throughput in it (e.g. without the options object) fails upon creating. So, it seems that updating throughput requires a different template than the one that was used for the initial creation. That’s not how I like my ARM templates…

So I set out to devise a workaround, where the end goal is to have a deployment pipeline that uses ARM wherever possible, and that can be run multiple times yielding the same result, i.e. is idempotent. I found that, while you need to use the options object to initially provision the throughput, the throughput is allowed to be set to null upon subsequent deployments. This can be leveraged by some piece of simple logic, that conditionally sets this value to either the specified throughput, or null, depending on whether it’s an update or a create:


{
"type": "Microsoft.DocumentDB/databaseAccounts/apis/databases",
"name": "[concat(variables('databaseAccountName'), '/sql/', variables('databaseName'))]",
"apiVersion": "2016-03-31",
"dependsOn": [ "[resourceId('Microsoft.DocumentDB/databaseAccounts/', variables('databaseAccountName'))]" ],
"properties": {
"resource": {
"id": "[variables('databaseName')]"
},
"options": {
"throughput": "[if(parameters('isUpdate'), json('null'), parameters('throughput'))]"
}
}
}

Now, I just need to pass that flag to the template from the outside. For that, I can use an Azure CLI or PowerShell task to determine whether the database already exists, and pass the result of that into the ARM template as an input parameter. I won’t go into the details here, but this should be easy to implement.

Obviously, this is not ideal. I’m sacrificing the decoupling of my ARM template from other tasks in my pipeline: the template depends on another task to provide input instead of just a parameter file, and I no longer have the option to let the ARM template figure out the database name based on naming conventions or whatever, because I need to know that name up front in order to be able to pass it to the CLI / PowerShell task. But, putting it all together, I do have a single template used for creates and updates, and a single place (i.e. the parameter file) to keep track of the throughput I provisioned. To me, that’s something worth a sacrifice.

The full ARM template looks like this:


{
"$schema": "https://schema.management.azure.com/schemas/2015-01-01/deploymentTemplate.json#",
"contentVersion": "1.0.0.0",
"parameters": {
"isUpdate": {
"type": "bool"
},
"throughput": {
"type": "int",
"minValue": 400,
"maxValue": 1000000
}
},
"variables": {
"databaseAccountName": "docsdbaccount",
"databaseName": "docsdb",
"docsCollectionName": "docs"
},
"resources": [
{
"apiVersion": "2015-04-08",
"kind": "GlobalDocumentDB",
"location": "[resourceGroup().location]",
"name": "[variables('databaseAccountName')]",
"properties": {
"name": "[variables('databaseAccountName')]",
"databaseAccountOfferType": "Standard",
"locations": [
{
"failoverPriority": 0,
"locationName": "[resourceGroup().location]"
}
]
},
"tags": {
"defaultExperience": "DocumentDB"
},
"type": "Microsoft.DocumentDB/databaseAccounts"
},
{
"type": "Microsoft.DocumentDB/databaseAccounts/apis/databases",
"name": "[concat(variables('databaseAccountName'), '/sql/', variables('databaseName'))]",
"apiVersion": "2016-03-31",
"dependsOn": [ "[resourceId('Microsoft.DocumentDB/databaseAccounts/', variables('databaseAccountName'))]" ],
"properties": {
"resource": {
"id": "[variables('databaseName')]"
},
"options": {
"throughput": "[if(parameters('isUpdate'), json('null'), parameters('throughput'))]"
}
},
"resources": [
{
"type": "Microsoft.DocumentDB/databaseAccounts/apis/databases/settings",
"name": "[concat(variables('databaseAccountName'), '/sql/', variables('databaseName'), '/throughput')]",
"apiVersion": "2016-03-31",
"dependsOn": [
"[resourceId('Microsoft.DocumentDB/databaseAccounts/apis/databases', variables('databaseAccountName'), 'sql', variables('databaseName'))]"
],
"properties": {
"resource": {
"throughput": "[parameters('throughput')]"
}
}
},
{
"type": "Microsoft.DocumentDb/databaseAccounts/apis/databases/containers",
"name": "[concat(variables('databaseAccountName'), '/sql/', variables('databaseName'), '/', variables('docsCollectionName'))]",
"apiVersion": "2016-03-31",
"dependsOn": [
"[resourceId('Microsoft.DocumentDB/databaseAccounts/apis/databases', variables('databaseAccountName'), 'sql', variables('databaseName'))]"
],
"properties": {
"resource": {
"id": "[variables('docsCollectionName')]"
}
}
}
]
}
],
"outputs": { }
}

Hope this helps!

Updates on IP Restrictions for Azure App Services

Two weeks ago, I wrote about the new VNet Integration feature on Azure App Services. This has everything to do with being able to lock down downstream systems to only accept traffic coming from a specific VNet under your control, as opposed to a set of public IP addresses that are managed by Microsoft, shared with other tenants, and prone to change.

Today it’s time to follow up on that. Because we may not only want to protect downstream systems, but also the web apps themselves. For public web apps, that protection typically does not exist at the network level, but wouldn’t it be nice if there was some network-level protection option available for private apps? Until now, the only real way to do that was by employing a very pricey App Service Environment. An ASE sits in your own VNet with all the security and flexibility this brings, but it is exceedingly expensive.

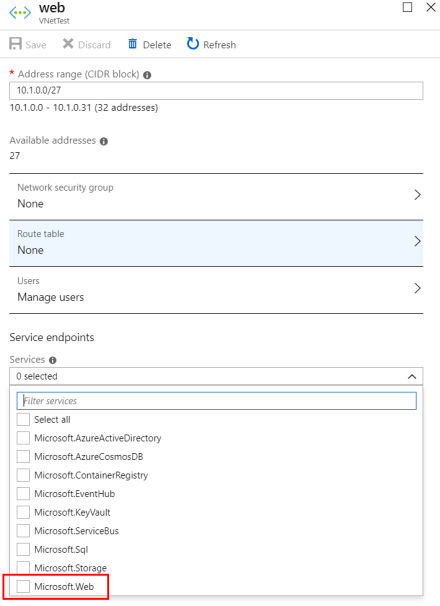
But the need to actually deploy an ASE has now disappeared if all you want to do is lock down access to a web app so that it’s only available from your network: the Microsoft.Web service endpoint has just become available!

That’s right: you can now configure a service endpoint for Azure App Services on one or more of your subnets:

ServiceEndpoint

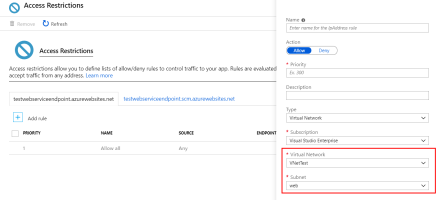
Then, on the Web App, you can configure IP restrictions to only allow your subnet to access the Service Endpoint:

AccessRestriction

So, there you have it: not only can you rigorously protect access to downstream systems while allowing traffic originating from Azure App Services; you can now also protect Azure App Services itself to only allow internal traffic!

Enabling Azure App Service VNet Integration ‘v2’ from CI/CD

If you’re anything like me, you want to automate everything from deploying your basic Azure infrastructure all the way to the application code. And the bar is set exceedingly high for deviations to this rule.

Sometimes – and especially with new and/or preview features – that requires some extra work, because support for such features in your deployment technology of choice may not yet be available.

Take the case of the new VNet Integration feature for Azure Web Apps. All very cool that it can be set through the portal, but that’s about the last thing I want to do when creating robust deployments. For me, ARM templates are the technology of choice when it comes to deploying Azure resources, even though a case can be made for alternatives such as Azure CLI. But in the case of VNet integration, both ARM and the Azure CLI are not an option yet at the time of writing. There aren’t even proper Azure Powershell commands to get this done.

In situations like this, I head over to the Azure Resource Explorer, and see if I can reverse-engineer what happens in the Azure Resource Manager API when I change a setting through the portal. Armed with that knowledge, I’m able to craft an API call that gets the job done. Wrapped in a fairly simple Powershell script, it may end up like this:


Param(
[Parameter(Mandatory=$true)]
[string]$subnetResourceId, ## Something along the lines of '/subscriptions/[subscriptionid]/resourceGroups/[resourceGroupName]/providers/Microsoft.Network/virtualNetworks/[vnetname]/subnets/[subnetname]'
[Parameter(Mandatory=$true)]
[string]$webappName
)
function Get-AccessToken {
$context = Get-AzureRmContext
$tokenCache = $context.TokenCache
$cachedTokens = $tokenCache.ReadItems() `
| Sort-Object Property ExpiresOn Descending
$accessToken = $cachedTokens[0].AccessToken
$accessToken
}
function Set-VNetIntegration {
$app = Get-AzureRMWebApp Name $webappName
$resourceGroup = $app.ResourceGroup
$location = $app.Location
$body = "{
""location"": ""$location"",
""properties"": {
""subnetResourceId"": ""$subnetResourceId""
}
}"
$url = "https://management.azure.com/subscriptions/$subscriptionId/resourceGroups/$resourceGroup/providers/Microsoft.Web/sites/$webappName/config/virtualNetwork?api-version=2018-02-01"
$accessToken = Get-AccessToken
Invoke-RestMethod Uri $url Method PUT Headers @{Authorization = "Bearer $accessToken"} ContentType 'application/json' Body $body
}
$subscriptionId = (Get-AzureRMContext).Subscription.Id
if ($subscriptionId -eq $null) {
throw "Not logged in. Please login using Connect-AzureRmAccount and select the correct subscription using Select-AzureRmSubscription; then try again"
}
Set-VNetIntegration

Some remarks here are in order, the most important of which is that the subnet with which the app is integrated, must be preconfigured with a delegation to Microsoft.Web/serverFarms. This is done automatically when you enable VNet Integration through the portal, but not when making the API call yourself like in the script above. Fortunately, this actually is settable through ARM, so no need to include it in the script.

Second, the script works with the ‘old’ AzureRM modules for all Azure interactions apart from the actual API call. For me, this works best for interoperability with Azure DevOps hosted agents, which didn’t support the new Az modules yet at the time I created this script. But of course it can quite easily be adapted to the new modules.

And lastly, this is not really pretty and production-ready code (but then again, is Powershell ever pretty?). It can certainly be improved upon, but for me this is a piece of dispensable code in the sense that I take it out of my pipeline and discard it, the minute ARM or Azure CLI support becomes available. It’s just that I don’t feel like waiting for that to happen before I can automate deployments that use this feature.

Hope this helps anyone looking for a way to automate the new VNet Integration feature, and just maybe it can also serve as a bit of inspiration as to how you could create your own temporary solutions to features not available in your primary deployment technology of choice.

New: SAS token support in the new Azure Service Bus .NET Core client

For some time now, Azure Service Bus comes with two client libraries. The first is the good old WindowsAzure.ServiceBus, which is functionally complete and mature, but requires the full .NET Framework 4.5. The second is the new Microsoft.Azure.ServiceBus library which targets .NET Standard and is therefore usable within .NET Core, but is not functionally complete yet.

ASB

But a couple of days ago, at least one of those functional omissions was (partly) resolved with the release of version 2.0.0 of the client, because this version now offers rudimentary support for SAS tokens. Rudimentary because it will not generate tokens for you yet, but it will play nicely with tokens you crafted yourself.

Why is that important? Well, because SAS tokens play a key role in messaging scenarios that cross organizational boundaries. When two parties from different organizations communicate via Request/Reply messaging for example, one or both parties will be communicating via one or more queues that belong to the other party’s organization. In those situations, you’d typically prefer granting access using SAS tokens instead of keys.

Because crafting a SAS token is a rather precise task that can take some time for first-timers, I created a simple Request/Reply sample that involves using a SAS token. It’s intentionally kept simple so you will want to expand upon it before using it in your own application; it just aims to showcase the general idea of generating and using SAS tokens in a Request/Reply scenario. Let me know what you think in the comments!

HowTo: Secure a Custom Webhook for Azure Event Grid

As I wrote before, I’m playing around with the new Azure Event Grid lately. As I mentioned in my previous post, custom event publishers and subscribers hold a lot of promise, especially while we are still awaiting the bulk of Azure services to be hooked up to Event Grid.

AEG

But for custom publishers and subscribers to actually lift off, we need some way to authorize calls, both those from the publisher to Event Grid and those from Event Grid to the subscriber endpoint. Now the first is pretty well covered in the docs. But the call from Event Grid to the subscriber endpoint is not very well described at this point in time. It just mentions some initial validation sequence, which is supposed to prove ownership of the endpoint but in actuality just verifies that the endpoint is expecting to handle Event Grid events.

If this were the whole story, having an Event Grid subscriber endpoint would imply accepting unauthorized calls containing event payloads, meaning anyone with knowledge of the endpoint address can send bogus events your way – and since you have no way to tell authentic from fake events, you’d also be opened up for Denial of Service.

503-error

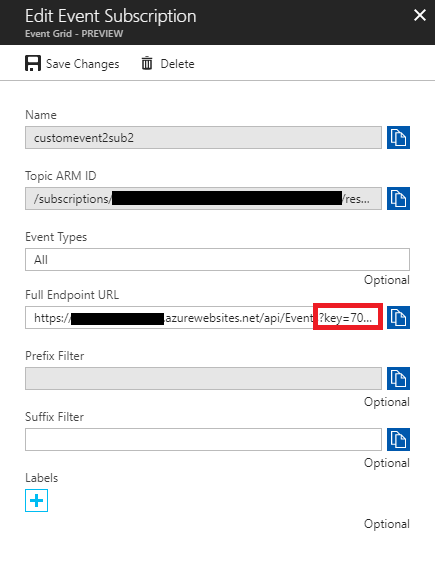
Luckily, a conversation with the Product Team quickly revealed that this is not the whole story. When you register a subscriber endpoint in Azure Event Grid, you can include a query string. This query string will be included in each and every call to your endpoint, so both the initial validation call and subsequent event notification calls. If you put some sort of key in there and then verify its presence in each incoming call, you’ve effectively locked out the Man In The Middle, and you just made a Denial of Service a lot harder.

EditEventSub

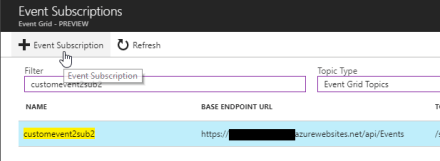
Furthermore, query strings that are added this way are not visible when enumerating Event Grid Subscribers in the portal, as an added layer of security.

ListEventSubs

I’ve updated my code samples to include a possible way to handle this for a ASP.NET Core WebAPI webhook.

Thanks to Dan Rosanova for clearing up how authorizing Event Grid calls to custom webhooks can be done.

Handling Custom Azure Event Grid Events

Lately I’ve been exploring the new possibilities opened up by Azure Event Grid, which was introduced last month.

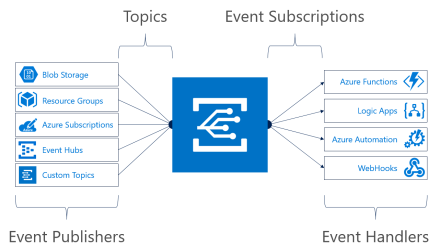
Azure Event Grid is a fully managed platform for publishing and subscribing to event notifications. It is intended to ultimately encompass all Azure services as event publishers and/or subscribers but it also allows for custom, non-Azure participants. At this point, the following publishers and handlers are available:

event-grid-functional-model

For a little bit of background information on how AEG relates to the other event offerings on Azure, such and Event Hub or Service Bus, see this write-up by Saravana Kumar.

Long story short: it all looks very promising, but since most Azure services are yet to be hooked up to Event Grid the custom topic publishers and WebHook subscribers may hold the most promise for the short term.

So I tried my hand at actually getting that to work with a console app for publishing and a ASP.NET Core WebAPI for handling; code is available here.

In general, it’s relatively straightforward. The only thing that took me some time to get right is the handling of the validation process. The issue was that the documentation says that the validation request contains a header ‘Event-Key’ with a value of ‘Validation’. In actuality, this is ‘aeg-event-key’ with value ‘SubscriptionValidation’. Since my API is routing the validation request to a special action based on the header, this is pretty relevant. But, let’s keep in mind that Event Grid is in preview at this point, and the documentation is part of that status.

Microsoft Build 2017 – Day 2

The first day of Build 2017 was packed with exciting announcements and great content, such as the announcement of IoT Edge, new stuff on .NET Core and .NET Standard, a lot of work on AI and ML, and much more; see Peter’s write-up for some more detail (in Dutch). So let’s see if the second day can top this :).

Keynote

The Thursday keynote was pretty much centered around Windows 10, and more specifically the Windows 10 Fall Creators Update, that will include new features such as OneDrive Files On Demand and Windows Timeline. With OneDrive Files On Demand, your files in OneDrive will be available for you to work with, regardless of whether or not they are actually present on the device. If they’re not, they’ll be pulled from the Cloud when needed. And with Windows Timeline, your work on these documents or whatever else you have going on, will travel with you from device to device, including Android and iOS devices. All this is made possible by combining Cortana and the Microsoft Graph to track your data and your activities. And how about copying something on your PC, and pasting it on your iPhone? You can do that with the Cloud Powered Clipboard. Obviously a lot more was covered during the keynote, which is available at Channel 9.

Discussing All Things Azure

An interesting new session format this year is the Open Q&A, and for me the one with Mark Russinovich and Corey Sanders was a must-attend. They discussed upcoming features in Azure, such as the future possibility to deploy most of the storage options, including Azure SQL Database, in a private network to cut it off from direct Internet access; or the expansion of Azure AD to include identity information for compute objects such as VM’s with roughly the same capabilities as computer objects in on-prem AD’s; or upcoming support for encryption at rest for all storage services. They also touched upon the state of Cloud Services as pretty much the oldest service in the book: it’s not going anywhere as long as customers depend on it, but don’t expect a lot of new innovations coming to it anymore.

Serverless, Containers, Service Fabric

Of course, serverless architectures are also among the top-ranking topics during the conference, as well as container services and Service Fabric. Some highlights in the serverless computing area are the availability of the Azure Functions Runtime for on-prem deployment of Azure Functions, increased Visual Studio tooling support for Azure Functions an so on. Service Fabric becomes increasingly integrated with all sorts of related technologies, such as Azure Networking, API Management, containers and .NET Core 2.0.

Presenting As A Form Of Art

And in closing this post, a honorable mention goes to the Anders Hejlsberg session on TypeScript. He did one of those sessions where it’s just a very experienced presenter with a microphone and a code editor, and he showed off some very cool stuff that’s made possible just by layering a type system on top of JavaScript. It’s impossible for me to do it justice here, so just watch out for the session to appear on Channel 9, and treat yourself to an hour of entertainment.

HowTo: Perform “On Behalf Of” Calls Using Azure Active Directory

Probably every developer out there is familiar with the scenario of a UI-driven application (let’s say a web app) that needs to make calls to a backend service, and in quite a few of those scenarios the backend service needs to know which user is logged in in order to fullfill the request. And if you have ever been in charge of deciding on an implementation for this, you have been at the crossroads: do I go with the full-fledged impersonation / delegation solution, or do I conveniently decide that I trust the web app to make the correct calls?

If you’ve chosen the latter, you went with the so-called trusted subsystem architecture. Simply put: your backend service is treating the web app as a system that can be trusted to properly authenticate end users, and only perform backend service calls if and when appropriate, possibly including end user identifiers (such as usernames) as part of these calls.

Trusted Subsystem
The Trusted Subsystem solution

If you opted for the full-fledged impersonation and delegation solution, you probably learned very soon that this is hard. In the old on-prem enterprise world, you would have to learn about the intimate details of Kerberos Constrained Delegation. And if you were ‘lucky’ enough to be working with WIF and WS-Federation or SAML, you would find out that these protocols do support these scenarios, but still make it pulling-your-hair-out-difficult to implement. And now we’re just calling one downstream service from our web app; once we need to call yet another service from the first service, we more often than not just give up and go with the trusted subsystem approach after all.

Azure Active Directory To The Rescue

Luckily, SAML and WS-* are no longer the only protocols available. OAuth 2.0 and OpenID Connect have been gaining momentum for some time now, and are treated as first class citizens in the latest Identity & Access Management solutions that Microsoft is offering, especially Azure Active Directory. To add to that, Microsoft has provided a client-side library called ADAL (Active Directory Authentication Library) for a variety of platforms (including AngularJS and iOS for example) to simplify interaction with Azure Active Directory as much as possible.

And the good news is: even impersonation and delegation has gotten really simple, with a lot less moving parts on the client. (Everyone who has ever struggled with config files trying to get this to work using WS-* and WIF knows exactly what I mean…)

The guys at Microsoft are also putting a lot of effort into code samples on Github that show how to use Azure AD and ADAL to get all sorts of scenarios working.

image

The On Behalf Of scenario is also available on there. It’s a native client that calls an API, which in turn calls the Graph API on behalf of the logged in user. Obviously, the native client app can be substituted for an ASP.NET Core MVC web app, as shown in this repo.

Not every platform-scenario-combo is available. For example, the API calling another API scenario (i.e. the On Behalf Of scenario) is not available in its ASP.NET Core incarnation. And since the code to achieve this for ASP.NET Core Web API is not readily deducible from the native client sample that is only available with a ASP.NET Web API, I’d like to share some of it here.

First of all, the middleware to wire up an ASP.NET Core Web API to actually consume tokens is a bit different from how it used to be done. You can take you queue from the aforementioned repo; just make sure to save the token you receive so that you can access it later:

app.UseJwtBearerAuthentication(new JwtBearerOptions
{
    AutomaticAuthenticate = true,
    AutomaticChallenge = true,
    Authority = String.Format(Configuration["AzureAd:AadInstance"], Configuration["AzureAD:Tenant"]),
    Audience = Configuration["AzureAd:Audience"],
    SaveToken = true
});

Actually using this token to bootstrap the On Behalf Of flow works like this:

var authority = [insert authority here];
var clientId = [insert client ID here];
var clientSecret = [insert client secret here];
var resourceId = [insert the resource ID for the called API here];

AuthenticationContext authContext = new AuthenticationContext(authority);
ClientCredential credential = new ClientCredential(clientId, clientSecret);
AuthenticateInfo info = await HttpContext.Authentication.GetAuthenticateInfoAsync(JwtBearerDefaults.AuthenticationScheme);
var token = info.Properties.Items[".Token.access_token"];
var username = User.FindFirst(ClaimTypes.Upn).Value;
var userAssertion = new UserAssertion(token, "urn:ietf:params:oauth:grant-type:jwt-bearer", username);
AuthenticationResult result = await authContext.AcquireTokenAsync(resourceId, credential, userAssertion);

The AuthenticationResult that ADAL is returning here contains an Access Token that can be used to call the downstream Web API. Simple, right? OK, it involves some code, but it’s pretty straighforward when compared to a WS-*-and-a-WCF-service scenario I wrote about earlier.

Enter Microservices

As said before, we’ve all encountered On Behalf Of scenarios and the perils of getting them to work using SAML, WS-* or Kerberos, and more often than not we gave up on the full-fledged scenario. But in an increasingly API-centered world, we are calling other external services much more frequently than we did only a couple of years ago. And now that microservices gains a lot of momentum as an architectural style, this frequency increases even more since fulfilling a user request in a microservices environment is pretty much always a matter of multiple services collaborating.

Advocates of microservices recognize that flowing user identities through services is a concern that deserves more attention in a microservices architecture. Sam Newman, for example, discusses this issue in his book Building Microservices, in a paragraph aptly titled “The Deputy Problem”.

He recognizes the ease of use that comes with OpenID Connect and OAuth 2.0. And while he is still somewhat skeptical about whether these protocols will make it into the mainstream market any time soon, for all you dev’s out there that are on the Microsoft ecosystem, this is not a concern anymore.

Extending The Scenario

Obviously, we want to do more than simply impersonate end users when calling downstream services. Especially in a microservices environment, where multiple clients are calling multiple services for even the most mundane of tasks, we may want to have varying levels of trust: “Sure, I’d be more than happy to perform this request for the user, but only if he is calling me through an application that is entrusted to make these types of delegated calls.” In order words, you may want to base your authorization decisions on characteristics of both the end user and the calling app.

Azure Active Directory is capable of handing these types of scenarios as well, for example by using scopes. I’m not getting into those now, but I’ll be teaming up with my colleague Jurgen van den Broek for a session at the Dutch TechDays 2016, in which we will cover these and a lot more scenarios – including a peek into the future by discussing what the AAD v2 endpoint brings to the table.

Immediately after the TechDays session, I’ll update this post with a link to the full code sample. So stay tuned, and feel free to post a comment if you need help in the meantime.